
Back to all networks



Intro to AD Lateral Movement
Premium roomExplore AD lateral movement and pivoting using PsExec, WinRM, PtH, and SSH tunnels.
medium
To access material, start machines and answer questions login.
Press 'Start' to begin
Please join this room to start the network
This will be enabled once the network is live. Please wait.
Can't reconnect? Try regenerating your VPN config.
When there are enough votes, the network will reset to its default state
You've breached the network, enumerated the domain, and harvested credentials from a compromised workstation. Now what? A single compromised host rarely holds the keys to the kingdom. The sensitive data, the Domain Controller, and the service accounts with elevated privileges, are all spread across the network on other hosts. To reach them, we need to move laterally.
Lateral movement is the process of using valid credentials, hashes, or tickets to move from one compromised host to another across an Active Directory environment. It is the bridge between owning a single workstation and achieving domain-wide compromise, and it is the phase where harvested credentials become truly dangerous.
In this room, we will work through the core lateral movement techniques, starting from a compromised workstation and moving deeper into the network until we reach the Domain Controller.
Learning Objectives
In this room, we will cover the following lateral movement techniques:
- Executing commands on remote hosts using PsExec and Evil-
- Performing Pass-the-Hash attacks to authenticate with hashes directly — no plaintext password needed
- Understanding how ticket reuse and Overpass-the-Hash extend lateral movement options
- Tunnelling through compromised hosts to reach otherwise inaccessible network segments using SOCKS proxies
- Defensive measures that detect and prevent lateral movement
This is by no means an exhaustive list of lateral movement techniques, but it covers the foundational skills you'll use on every engagement. More advanced techniques — including Kerberos ticket abuse, advanced pivoting with Chisel and Ligolo-ng, and multi-host pivot chains — will be explored in later rooms.
Prerequisites
Before starting this room, you should be familiar with the concepts covered in the following rooms:
- Active Directory Basics: Understand objects, groups, and domain structure
- Intro to AD Authentication: Understand NTLM hashes, Kerberos tickets, and how AD authentication works
- Intro to AD Credential Harvesting: Understand where credentials are stored and how to extract them
You should also be comfortable with basic Windows and command-line operations.
Starting the Network
Before moving to the next task, click the green Start button under the network diagram. Give the network enough time to launch.
You can connect to the network in two ways:
AttackBox
If you are using the Web-based AttackBox, you will be connected to the network automatically if you start the AttackBox from the room's page. You can verify this by running the ping command against the IP of the ROOTDC.THM.LOC host. You should also take the time to make note of your IP. Using ifconfig or ip a, make a note of the IP of the tun0 network adapter. This is your IP and the associated interface that you should use when performing the attacks in the tasks.
Other Hosts
If you are going to use your own attack machine, an OpenVPN configuration file will have been generated for you once you join the room. Click the Download VPN Profile button in the Network Control Panel:
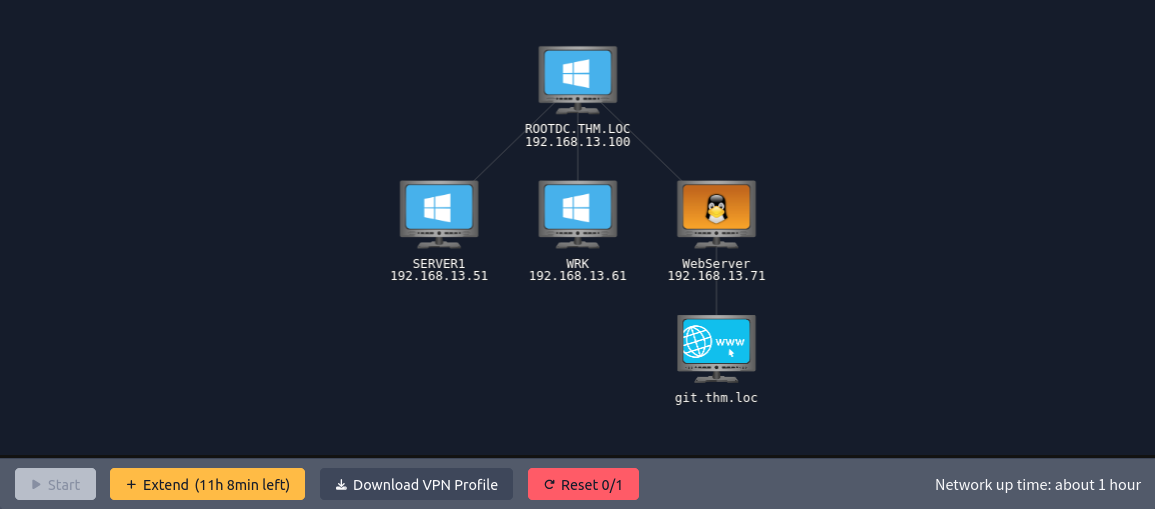
Use an OpenVPN client to connect. This example is shown on the Linux machine; use this guide to connect using Windows or macOS.
OpenVPN
           user@tryhackme:$ sudo openvpn ad-introlatmov.ovpn
2026-05-01 15:30:18 OpenVPN 2.6.14 aarch64-apple-darwin24.2.0 [SSL (OpenSSL)] [LZO] [LZ4] [PKCS11] [MH/RECVDA] [AEAD]
2026-05-01 15:30:18 library versions: OpenSSL 3.6.1 27 Jan 2026, LZO 2.10
[....]
2026-05-01 15:30:20 /sbin/ifconfig utun4 192.168.21.2 192.168.21.2 netmask 255.255.255.0 mtu 1500 up
2026-05-01 15:30:20 /sbin/route add -net 192.168.21.0 192.168.21.2 255.255.255.0
add net 192.168.21.0: gateway 192.168.21.2
2026-05-01 15:30:20 /sbin/route add -net 192.168.11.0 192.168.21.1 255.255.255.0
add net 192.168.11.0: gateway 192.168.21.1
2026-05-01 15:30:20 Initialization Sequence Completed
The "Initialization Sequence Completed" message tells you you are now connected to the network.
DNS Configuration
Before we begin, we need to ensure our attacker machine can resolve the hostnames used in this lab. The network diagram above shows the environment we'll be working with:
| Host | IP Address | Role |
|---|---|---|
| WebServer | 192.168.13.71 | Compromised Linux host and your SSH pivot point. Also hosts internal web services (Gitea) |
| WRK | 192.168.13.61 | Windows workstation |
| SERVER1 | 192.168.13.51 | Windows server |
| ROOTDC | 192.168.13.100 | Domain Controller |
You start with the following:
- SSH access to the WebServer as
jdoewith the passwordSummer2026! jdoehas local administrator rights on WRKjdoeis a member of Remote Management Users on SERVER1 (but not a local administrator)- A harvested NTLM hash is waiting to be discovered on one of the hosts as you progress through the exercises
This mirrors a real engagement: you've compromised one host, you have a set of valid domain credentials, and now you need to use them to move deeper into the network.
There are two ways to configure name resolution on your attacker machine:
Use the DC as Your DNS Server (Other Hosts)
When using your own attack machine, the domain controller serves as the DNS server for thm.loc, so pointing your resolver at it handles all domain lookups automatically:
      user@attackbox:~$ sudo systemctl disable --now systemd-resolved
user@attackbox:~$ echo "nameserver 192.168.13.100" | sudo tee /etc/resolv.conf
This is the recommended approach, as it also enables -based enumeration such as SRV record lookups in Task 3. If you need external internet resolution as well, add a second line: nameserver 1.1.1.1.
Static /etc/hosts Entries (AttackBox)
On the AttackBox, and if you'd rather not change your DNS configuration, you can add the entries manually:
user@attackbox:~$ sudo nano /etc/hosts
Add the following:
      192.168.12.100    thm.loc
192.168.12.71     git.thm.loc
This works for all the practical exercises.
If you encounter any issues, please reach out to us on Discord or via email at support@tryhackme.com.
Answer the questions below
I'm ready to move laterally!
Ready to learn Cyber Security?
The Intro to AD Lateral Movement room is only available for Premium or Max subscribers. Signup now to access more than 500 free rooms and learn cyber security through a fun, interactive learning environment.
Already have an account? Log in